Tuesday 23 February 2021

Coming un-hinged

The corner cupboard for T. Tjørngren's apartment was coming along just fine.

Of course, I the glasses didn't quite fit into the top shelf (I knew, I should have tested them before gluing the shelf in place) but I was able to carefully sand the slots until they were wide enough for the glasses I have. 


Next, I built the doors. To get the rebated panels I sandwiched 3 layers of thin bass wood, even managing to to cut the curved upper edges to the front panels. 

Before gluing the panels on the front of the doors in place, I had 'undercoated' and sanded the front, thinking it would be much easier to get the nice and smooth that way. I also painted the inside of the doors the same pale yellow as the inside of the cupboards. Dry Australian summers are not kind to paint and I since I had mixed the colour a bit randomly, so was worried that if I left it too long, it would dry out and I wouldn't be able to match it later.

So far, so good. I was really pleased with how it was coming along. The plan was to to next pin-hinge the cupboard doors to the top, middle and bottom sections when I stacked the modules...

That's when I came unstuck!! 

Because I had built the drawer so it sits directly below and flush with the upper cupboard door there is nowhere for me to drill a hole to take a pin for the bottom of the door.

Ups! Now what?

Option one: redo the top cupboard with the drawer in a separate housing to take the pin for the cupboard door, or...

Option two: attach the doors with proper hinges (scary).

I really like the look of the drawer directly below the cupboard door and didn't really fancy rebuilding the whole top section. The problem with hinges are 1) The thickness of the door and frame is only 3mm, 1/8" or less. I don't have any hinges that tiny in my stash, and don't even know if they are available. 2) I am petrified that I will mess it up, trying to attach tiny hinges.

In the end, I decided to go with the hinges after all. I figure, if I do mess it up, I can always revert to option one and rebuild the top but it is worth a try. Now what to do about hinges??

I have had a go at making little hinges some time ago, so figured that by making them myself, I can get them the exact size I need them.


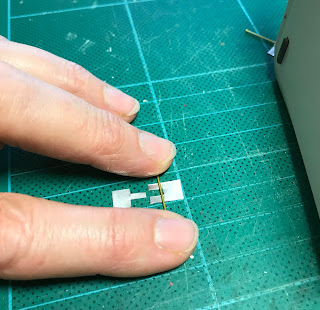
I cut the parts (6mm x 10mm wide) from tealight casing. This metal is so soft and pliable, that I could cut it with a craft knife which resulted in better, cleaner cuts than my scissors.


I knew from last time I made hinges, that my needle-nose pliers are not thin enough to roll the barrel to take the pin (sewing pin cut down) snugly. So instead, I simply folded the metal back over the wrong side of the hinge place. This metal is so thin and folded bit will be under the hinge once it is attached so I figure, once the rebates are cut in the wood, the extra tiny bit of thickness won't matter.


I then punched holes in the hinge plates to nails later just using an awl unto my cutting mat. To prevent the pin from falling out, I added a small dollop of glue to each end of the barrel as I cut the pin down to fit. 
And there four hinges ready to go. They are not perfect, but I am hoping they will do the job.

For now, I need to build and attach a pelmet at the top and some kind for feet to the bottom. Paint the cupboard and then hope and pray my little hinges work.

Wish me luck.

Anna 

Monday 15 February 2021

Corner cupboard

There is still lots of little bits and pieces to finish on the upstairs apartment and I really haven't done anything on this room since.... way back when.


Half the pictures are still stacked against the walls and furniture; I still haven't hung the curtains; and I want to make a plant or two - especially for that gorgeous red and white pot by Lorie March that I was so lucky to win in a giveway a little way back. 

So this week, I finally set about building the last piece of furniture. I know the small room looks pretty packed already and I am hoping this last piece won't be too imposing. 
I am going to be  making a corner cupboard to go house the 'good' dinner set and other special bits and pieces. It is going to go in the right hand corner of the room. Once it is done, I am thinking the longcase clock (made from this Chrysnbon kit) may need to move over a bit and the small sidetable by the door will have to go. We'll see.


I did a bit of looking for corner cupboards online for ideas. These cupboards were quite common. My guess is, that in small rooms and apartments, being placed in the corner is rather space saving and still offers plenty of storage space. So searching in Danish brought up loads to images, many from antique store listings so they had the dimensions. A real bonus since that gave me something to work with. 
I didn't plan to try and copy one exactly, but I really like the one in the picture above - especially the way the drawer is set in - so away I went.


After drawing it up, I cut out paper templates just to test the size before I started building anything. I then decided to build it in modules, a top and a bottom. This allows me to have the top slightly smaller 
and will make it easier (I hope) to secure the doors (which I will pin - still to scared about hinges LOL).
I had really planned just for two shelves in the top section, but once I was at it I couldn't resist trying to cut a curved shelf with little slots for hanging fine glasses - I like how it looks, but I forgot to test if I have any glasses that will actually fit, so fingers crossed..


Building it this way also made it easier to work out how to make the drawer. I started by building the drawer itself, minus the front, and then put dividers under the bottom shelf for it to slide evenly. The front piece of the drawer will go across the full width of the cupboard front, so I won't cut that until I can measure exactly how wide I need it to be.


At this point, I realized it will be near impossible to paint the inside neatly, once the front panels are glued in place, so I have started painting it a pale cool yellow like the original in the picture. It still needs a couple of coats, but I am so glad I decided to this now and not having to get my brush inside it later on.

So far, so good. My next challenge is going to be cutting the 45 degree edges on the front panel pieces. I don't have any fancy tools for this, so it will be trail and error and a lot of sanding I guess.

Have a lovely week everyone and stay safe wherever you are.
Anna X