Showing posts with label Exteriors. Show all posts

Friday, 10 December 2021

Finishing the first room box

'Be careful what you wish for' - would also be a suitable title for this post.


The whole idea of adding a Furniture & Bric-a-Brac shop to this house was to have somewhere to put furniture and other bits and pieces until they find a more permanent home.

I was determined not to put anything in the box until I had at least finished it, but as you can see, that plan did last long LOL. 
It was oh so easy to just 'try' a few minis in the room and before I knew it...

I had fun one night making an assortment of painting and just popped them in here to dry. The window leaning on the right hand wall will one day sit in the stairwell of the Florist's house next door. 
The rocker (a plastic Chrysnbon kit) is also destined for the Florist's apartment - I gave up counting the number of layers of paint I gave this one before getting a colour I liked. 
Resting on the rocker is the light that will be fitted in this room - when I get around to it. 

I really wanted to finish this box, so... 
Step one: Empty it.


I hadn't planned to have a shelf when I started this room but liked the idea of being able to pile a high shelf full of boxes and odd bits and pieces. 
I made the shelf from strips of basswood and stained it to look like oak. The brackets are just card painted with black gesso. Now it is nice and sturdy and ready to be piled full 😊

Then I moved on to finishing the outside of the box.
I had painted the walls with crisp white milk paint - In real life the walls would have been lime washed and would be shining white right after painting, but... 
...it was just too blinding white!

After looking at it for a couple of weeks, I gave them a thin coat of a warm white called London Fog (that kind of says it all, doesn't it?) It still needs to be distressed but I am so much happier with the colour. 


To make the studwork, I cut strips of 1mm (1/32") balsawood. Even with balsa that thin, I had to shave a bit of the edges to shape each piece so it didn't protrude from the render. 
NOTE to self: make the layer of render (filler) thicker on the next boxes. 

Before gluing the strips in place, I stained them with the same stain as the self inside to look like weathered oak. I had found this 'stain' recipe online (and have happily forgotten where). It is so easy to make and is non toxic. 
All you do is put steel wool and some black tea leaves (I just emptied a couple of teabags) into a jar and cover it with white vinegar. Then leave it for a little while (I had mine sitting around for a few months, only cause I didn't need it at the time) - and That's IT! 
Like other stain it is awfully messy to use so wear gloves, but I absolutely love the subtle colour of it. 

...and with that: 
The ground floor of the K. Larsen Furniture is as finished as it can be for now.


Have a lovely weekend everyone, and thanks for stopping by.
Anna X


Thursday, 20 May 2021

From wood to terracotta

I have just realized, I completely forgot to show you how my roof tiles turned out. 


Pale wood beading has been turned to 'terracotta tiles'. I really enjoyed the process of these make-believe tiles and am really happy with how it has turned out. 

I started by giving the entire roof an undercoat of black gesso. I wish, I had remembered to take a photo. I think, I am in love with black gesso - it looked amazing! It made me want to build a house with glazed black tiles.


My thinking behind using black instead of the usual white, was that black would tone down and 'dirty' the terracotta paint rather than making it bright as a white undercoat tends to do. In the picture above, the tiles had had just a single coat of terracotta over the black. 

The 'ridge tiles' are made from a length of 'half-round' wood beading with narrow card strips glued over the top for the individual tiles. 


A second coat of paint and the tiles are starting to look like terracotta, but now it was too clean and uniform for an old house so...


Back to the painting. For this last coat, I painted the tiles one by one, randomly mixing the paints, most burnt sienna, with bits of red and various browns thrown in for good measure.
I have never attached the roof to the house. I was going to, but it just rests nicely onto the house, fitting into two notches, so I am not sure I will ever hinge it. One thing is for certain; it came in really handy to be able to lift it off and work on it. 


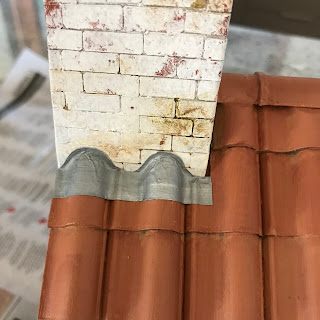
Next up was the zink flashing. This is just thick foil painted with silver acrylic paint a trick I found in 
'The big book of a miniature house' by Lea Frisoni. I was glad that I had painted plenty of foil because it took quite a few trails before I worked out how to get the foil strips to fit in and around the ridges in the tiles. 
Note to self: use heavier foil in the future.


In the end, I worked out a rough template. It is not perfect, but it looks ok for an old roof. 


After that was all glued in place, I 'dirtied' and weathered the whole roof. It might need a bit of dirt and grime and I am toying with the idea of moss growing here and there. We'll see...


So will I do this kind of roof again? I think it works, so I am pretty sure I will. 

But next time, I might like to try and find a wood beading with a slightly more shallow profile so that I can get a neater finish on the zink. And - if the house is any bigger than this one, I just might have to invest in a better saw (read 'something electrical'), because I am not sure, I would want to cut any more tiles than this by hand. 


And so - I think the house itself is finally finished. Is a house ever really finished? 

There are still empty shelves in the shop, the curtains in the apartment needs to be hung and Truffle is still waiting for his basket. But the house itself is finished. 

Have a great weekend everyone,
Anna X


Saturday, 27 March 2021

Roof tiling

I am rather horrified to admit my Toy House has been sitting without a proper roof since... well since Lock Up.
At least, I had painted the roof, just so it wouldn't look too horrible while I worked on the finishing touches. 


The thing is - I wanted a tiled terracotta roof like these: 


As you can see, these types of tiles are different to the barrel tiles seen in southern Europe and are laid in straight lines with interlocking ridges (does that make sense?).

I searched online for mini-versions to buy or tutorials for how to make them. I did eventually find these from Miniacons in Spain. Real terracotta in the right scale - Perfect.... 


... only getting them sent to OZ was going to be more expensive than I was prepared to pay. Perhaps I could make them...?
For several nights, I had a production line going.


I used airdrying clay, rolled out really thin. To get the undulations in the tiles, I made up a board from scarps of plywood and wooden sticks. I could then lay my clay strips across the ridges...


...and press the soft clay into place. Once the clay was half dry, I scored the strips so that they could easily be broken into individual tiles. It was all looking every promising. 
But when I started laying them - and, I did (luckily) do a small practice run - I soon realized that they were nowhere near precise enough. Overlapping them caused more problems,  I would need to do so much sanding and tweaking along the way and I was far from convinced that it would be successful. Sigh.. 
So there the house sat,
and sat,  
and sat.
Patiently waiting for a roof.

I had right at the beginning, briefly looked at these wooden tiles from Mini Mundus, but had held off getting them because of the cost. 


Then, during a hardware store visit, I spotted a timber molding with very similar profile. Perhaps I could..???
I bought just one length to give it a try. And as the saying goes: 'the rest is history'.


I cut the molding into tile size pieces and got to work. I don't have any fancy tools, so I just used whatever was at hand to make sure all the tiles were the same length.


I originally had thought, I would tile the roof of the dormer window also. I felt the tiles were a bit heavy, so decided to cover it in zinc (painted heavy duty foil) before I started placing the tiles.


I glued down narrow coffee stirrer sticks above each row of tiles before starting the next row. This is to slightly lift the lower edge of each row, so it looks like it overlaps.
I am so glad, I had left the roof loose. It is so much easier to just lift the whole thing off while I work on it rather than having to move the whole house around.

Cutting in around the dormer was 'fun', especially the angles around the roof, but I think it looks ok. 


I still need to finish the 'ridge' tiles - just a piece of half round timber beading before I can paint. But at least it is now starting to look like a roof.

Have a lovely weekend everyone.
Anna X 


Tuesday, 14 July 2020

At 'lock-up'

I have slowly been working away on the Toy House. I kept thinking, I really didn't have much to show & share and then...


... all of a sudden, the exterior is (almost) finished - from a plain sheet of plywood, I have built a house.

Now, the idea for this blog was to have somewhere to make 'note-to-self' to record how I got there, but looking at it now, I realize, I probably should have written a bit more along the way. Never mind, here is goes:
After I had stacked the three room boxes it was finally time to get to work on the exterior. The house front was going to be hinged and the roof (for now) lifts off completely. so I figured it would be easier to do as much of the finishing as I could before attaching the front. 

First up, my handy husband helped me cut the holes for windows and door. I taped off the openings from the inside, so the render would go a little bit up over the window and door frames.
 

I then 'rendered the front and the sides of the house shell with powder filler mixed with 2/3 water and 1/3 pva glue. I had learned from rendering the attic walls that the powder filler when only mixed with water, was quite fragile and porous and I don't want to the outside of the house to chip or flake. By adding the glue, the render is now much more hard wearing. I deliberately didn't smooth the render too perfectly - remember this is a very, very old little house!
The outside is painted with satin acrylic paint. It was way too 'perfect and too shiny so I have it a few washes of cream chalk paint over the top. Again, I have tried to deliberately make the paint a little uneven to look older and a bit weathered. 


I had not rendered the area behind the shop sign. I painted that section a slightly lighter shade of the wall colour and added a timber moulding (upside-down skirting) for the detail below. That also gives the wee soldiers at each side of the shop sign something to stand on :-) 
I am no good at painting, so I printed the sign onto watercolour paper (I like the texture). I then carefully went over the lettering with paint and a fine gold pen before giving the sign a very light sand and carefully 'aged' it with the tiniest bit of very weak tea. 

I had made all windows and adapted this door ages ago and had them painted and stashed away in a box, waiting to be popped into place. All the windows are made from strips of card stock with balsa wood frames. Back then, I wasn't taking picture, sorry. 
I had removed the original door frame so that I could add a fanlight above and by doing so, make it the same height as the shop window. 


The windows for the apartment and loft are all hinged, using This Tutorial for paper hinges by Aurelea Krieger. To make them a little stronger, I mixed the paint with pva glue and gave them a very generous coating. They are still not made for constant opening and closing, but the glue certainly makes them a little more durable. 


You will notice the windows open out which is most common in Denmark. I have added little knobs (pins) on the inside but I must confess, I stopped short of adding hooks and latches to keep them closed. Maybe next time...


Next up was the front step and narrow cobblestone footpath. The step was pretty straight forward, made from a block of balsa, suitably sanded for wear in the middle. I had imagined that I could make the cobblestone from air-drying clay and glue it in place but as it turned out, it shrank too much and just wouldn't work. Instead, I opted for the same filler and glue mix I had used for the walls and then scored the lines between the stones before it was completely dry. This wouldn't work for perfectly even paving stones but for uneven cobblestone I think it does the job just fine. 
I have since neatened the front of the footpath with a bit of timber, but I haven't decided yet if I will simply paint it or clad it with 'bricks' or 'stones'. 


I had a fabulous time painting and aging the exterior and the cobblestone was especially good fun. I still want to add a bit of moss and perhaps a dandelion or a few tufts of grass growing in the cracks here and there. 

The down pipe is made from a length of 6mm (1/4") balsa dowel. To make the spout, I wrapped the end with a bit of card. The brackets are also made from card with black marker dots for bolts (Thanks to Brae on Otterine's Miniature).
I also added card brackets to the ready-made gutter so it didn't look like it was 'just stuck' onto the wall. 


I was pretty pleased (and surprised) that I managed to cut the angles for the bends at the top of the downpipe correctly. The fact that it is the right distance from the wall to fit the gutter at the top is a complete 'fluke' - I was so focused on cutting the angles right that I forgot to measure it other than by just holding the piece against the wall. You have to be lucky sometimes. 

And with that, the facade is pretty much done and my plywood boxes have become a house. 

But there is still the 'almost finished' left. You would have noticed that the roof is just painted - for now. I am still working out what to do about tiles. I have been trying to make them, but that is a story for another day....

Have a lovely week everyone.
Anna X