Monday 11 October 2021

Furniture shop; Walls & Floor

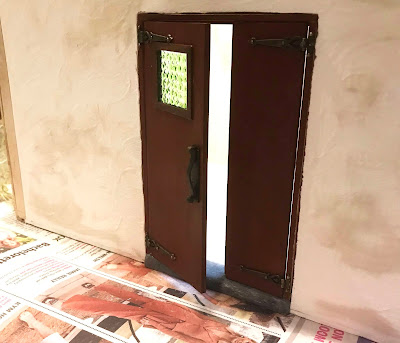
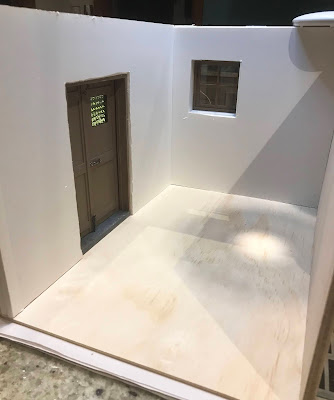
 With the first two boxes build and the exterior 'rendered', I couldn't resist testing the door to the smaller shop. It fits perfectly and the light shining through the stained glass is just as I have hoped. 


I decided to start with the smaller box because I think it is the simpler of the two. I am going to be building up the thickness of some walls. I like deep-set windows and doors and want to try and create the illusion of lined stone walls. 


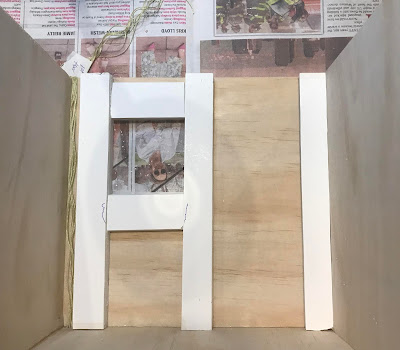
Starting with the back wall, I cut strips of foam core. I only have 6mm (1/4"), so I doubled these to get a 12mm (1/2") thickness. 
The strings running along the channel on the left will be used to guide wires through to the base of the house later. I am already worried that I might be creating headache for myself later on by having all the wiring complete concealed within the wall space...!? I might try and think up a solution for a couple of access points - we'll see.


I added a full sheet of foam core on top and couldn't help myself to test how it will look once the window goes in. It is certainly getting the depth I was hoping for. 


I repeated the process on the side wall that will house the door. This time though, only adding one layer of strips for the depth.


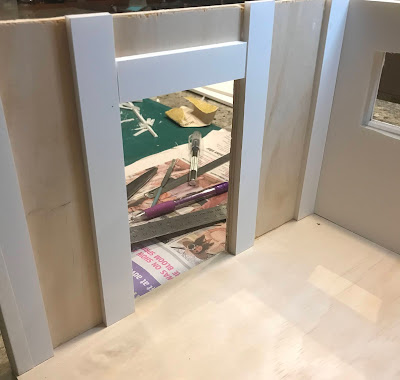
When I build the door, I had made the frame to fit two layers of foam core + the plywood shell - only I didn't measure my foam core because( I thought) I knew it was 5mm thick - Turns out is is 6mm so the door frame is too thin by 2mm (1/16")  (NOTE TO SELF: Always measure and double check!)


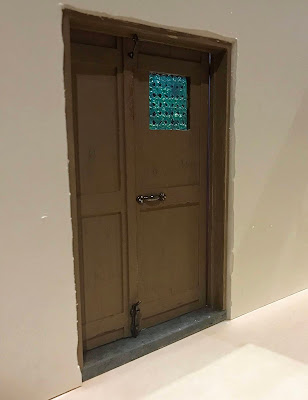
I am not planning on having an architrave around this door anyway so instead of building up the door frame, I cut the edge of the foam core to slightly round it off. 


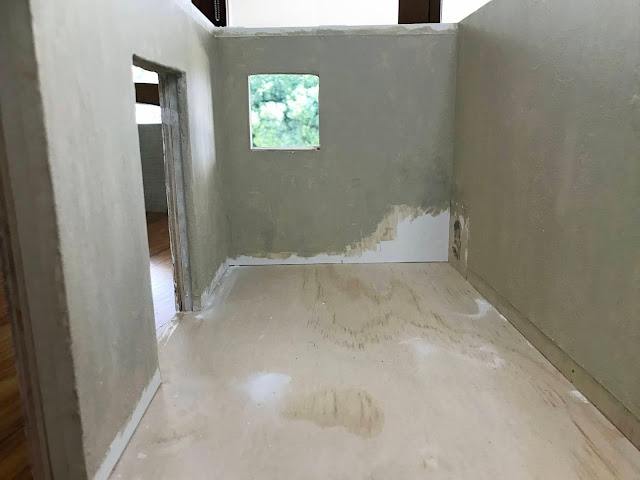
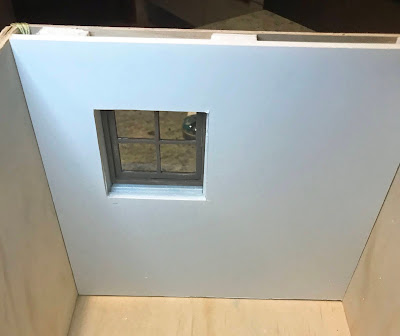
I have 'plastered' the walls with the same mix as on the outside and painted them in a sandy-beige colour. (Jo Sonia 'Smoked pearl'). I have only given them one coat and done a pretty patchy job. I am still pondering that I might give them a very light sand to smooth them down just a bit and wear down the paintwork even more.
Between the walls drying, I made a start om the floor. 

I used craft sticks glued onto a card template of the floor. Last time I did this, I had terrible trouble with them warping. This time I was extra careful when gluing them down and sure each had an even smear of glue to the very edges and put heavy weights onto everything right away. They dried nicely overnight. 


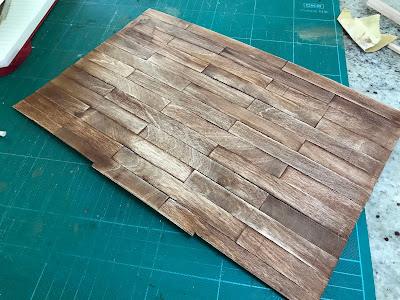
Then multiple thin layers of stain (watered down acrylic paint) to build up colour with sanding between. For the first two layers of stain, I dried the floor straight away with my hairdryer. It all worked and there is no warping this time. This is a good old worn floor so craft sticks are perfect for the look. They are not always completely straight, but for this old floor I have deliberately not filled it in the gaps but instead pushed a bit of very brown paint into them; just think in years to come, when someone decides to renovate this old house and put in a new floor, they might find old coins, bits of paper, buttons and other tiny treasures that has fallen down into those crack.

I have glued the floor in place in the box - as I write it is drying weighted down by a heavy library of books. Fingers crossed it sticks down nicely. 

Keep well everyone.
Anna X


Monday 4 October 2021

The building begins

Ok, I didn't completely just start building a door without a plan 😄 

This next house, will sit next to the Toy House and started to take shape in my mind a long, long time before the Toy House was anywhere near finished. 

I wanted to build a Florist (Ea's Flowers) - a room filled with colour and pretty things. I love my real life garden, worked in florist many years ago (more about that connection later) and have discovered I really enjoy making mini flowers, but...

.. when I began reading miniblogs not so very long ago, everyone seemed to have 'a stash' of just about anything and everything. Turns out that is easy to do and I have managed to build up quite a stash of furniture, furniture kits and mini accessories that don't have a specific home to go to yet so end up in boxes 'for later' and I forget I have them.

I decided, I needed to build some kind of room box, like an attic or something, to put them all in while they wait for a suitable home. I wasn't very excited about the prospect of building this 'box', it felt more like a 'I need to do this' kind of project.

Then it came to me.. what if I could combine the two? Could I perhaps just stick the furniture in the attic above the florist?

I had been enjoying following the making of The Old Misery an old Coach Inn on the TheInfill blog (have looked everywhere for the creator's name, and just can't find it). The story and make of the build is so incredible and captivating, but what really inspired me was the archway in the middle of the building. It got me thinking...

...what if I combined my Florist with a furniture, bric-a-brac, antique kind of dealer shop for my mis-matched furniture and other bits?? With an archway between where both flowers and furniture can spill out into? 

Inspiration photo - Sudergade, Helsingør.

Suddenly I had a very clear picture in my head how this house will work. I can't do pretty sketches like some of you, so after scribbling my ideas roughly out on paper, I drew this 'draft' on the computer.

Draft plan for façade 

It is pretty much the Toy House x 2 with an archway thrown in.

The Florist will be in the bigger shop to the left, with a small apartment above (oh, I can't wait to do pretty). To the right will be the Antique / Furniture / Second hand shop (Kaj Larsen & Son) with the door from my last post inside the archway. This shop is (deliberately) tiny on the bottom floor and will have stairs to a larger shop floor above.

Back of house

Like the Toy House, this will be a front opening house. The trouble with front opening houses is often the lack of windows. I love windows! 
Yes, you loose some wall space, but I like what they add to a room with the light coming in. So, this house will have windows at the rear - lots of windows! (and as you can see, some kind of door on the first floor of the furniture shop, since it clearly is impossible to get large pieces of furniture up a narrow staircase). 

Like is very often the case with houses in the old Danish towns, the front will be painted or 'white washed' but the timber studwork will be left exposed at the back. 

I am going to build this one as a series of individual room boxes, much in the same way as I did the Toy House. I liked building that way because I can work on one box at a time, easily move it around and get into the nooks and crannies easy. So, here it goes....


The first two boxes. I am using plywood again this time even though it does have a tendency to warp, but it is easy for me to cut. I found when I did the last build, that because the individual pieces are smallish, any warping does not tend to become a big issue especially since everything will be covered and cladded in one way or another. Besides this is an old house... 


I couldn't wait to 'tidy up' the outside of the boxes, so masked off the pattern for the studwork right away. 

A coat of render: filler compound mixed up with 1/2 water, 1/2 pva glue to make it nice and hard wearing. 
It is beginning to look like a house already :-)

Have a lovely week, everyone!
Anna