
Welcome to Kaj Larsen Furniture store.
The first floor of Kaj Larsen Furniture now looks more like a room than a little wooden box.
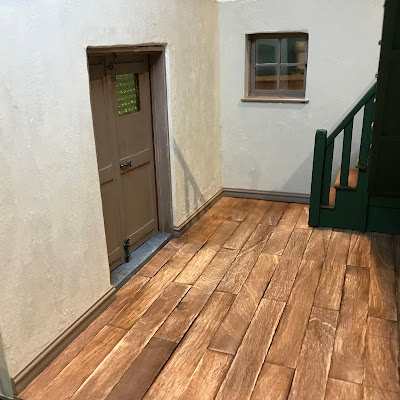
Once the floor was glued in place it looked a little too shabby. Even though this space is a workroom (Once upon a time the saddler worked here) converted into a shop space, the current owner Kaj Larsen is a man who takes pride in good presentation. I didn't have any furniture wax, but a friend had given me a massive chunk of bees wax. I rubbed that onto the floor and gave it a good rub after warming it up with a hair drier... It did the trick, I think. The worn oak floor now has a rich depth and slight shine to it.

The skirting boards went on easily, although the tiny pieces into the front door step were incredibly fiddly.
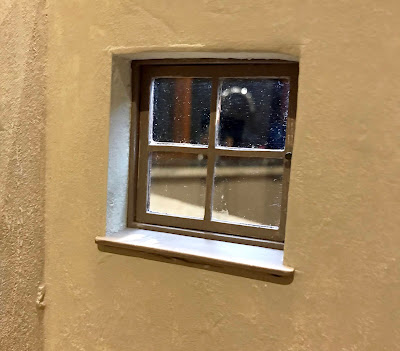
Never mind... there will be more thick walls and deep sills in this house, so plenty of time for that.
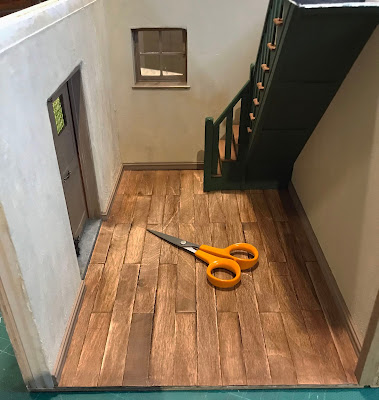
I popped my small scissors on the floor, so you can better get an idea of just how (deliberately) small this room is. Only 20cm (8") wide and 33cm (13") deep after the thickening of the back wall. So with one corner taken up by the stairs, it is not going to take much Furniture & Curiosities to fill it to the brim.
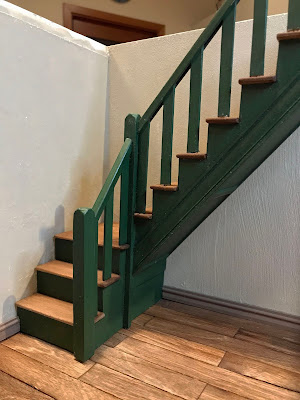
Stairs
I built the stairs based on the instructions in Lea Frisoni's 'Big Book of a Miniature House' and (almost) completely forgot to take photos while making them. The stairs are mostly made from card stock, with balsa steps. I had to adjust Lea's measurements to fit the space. Since I am hopeless at measuring and ruling straight lines, I drew the stringers (the side bits) to scale on the computer and printed them out. Then I could glue those to the card and simply cut along the printed lines. It worked really well and I will be doing it that way again.
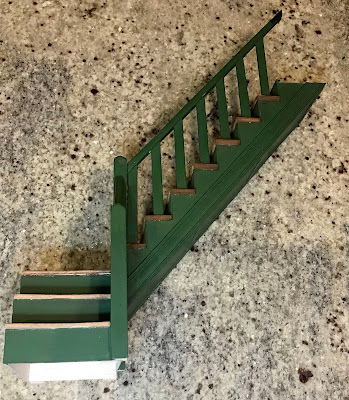
The side of the long stringer looked a little bare, so I glued a timber molding in place for a bit of subtle decoration.
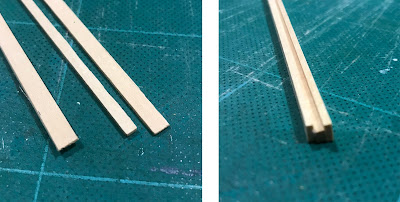
The banisters and handrail is all made of wood. I didn't have a handrail and was too impatient to order one and wait for it to arrive. So I decided to try and make one using 2mm thick strip wood
I cut 2 x 5mm wide strips and 1 x 3mm strip and glued them together with the narrow piece in the middle and all of them level on the top edge (apology for the blurry photo - it was the only one I took). The idea behind this was to create a 2mm wide groove to slot the uprights (spindles?) into so the whole structure would be more sturdy. I sanded the upper edge to a smooth round so the mini customers don't get splinters in their little hands.
Getting the railing structure secured onto the steps proved rather more tricky. One thing was getting the angles right (I used my printed template again so I could glue it laying flat) but I hadn't thought of how I would secure it to the steps...
I ended up drilling tiny holes at the base of each upright and gluing a metal pin into each with super glue. I then super glued the railing in place, pressing the pins into the soft balsa steps. It is not perfect but kind of worked. The railing is securely in place but I am sure there must be a better way of doing it. No more railings in this house, so that discovery will have to wait.
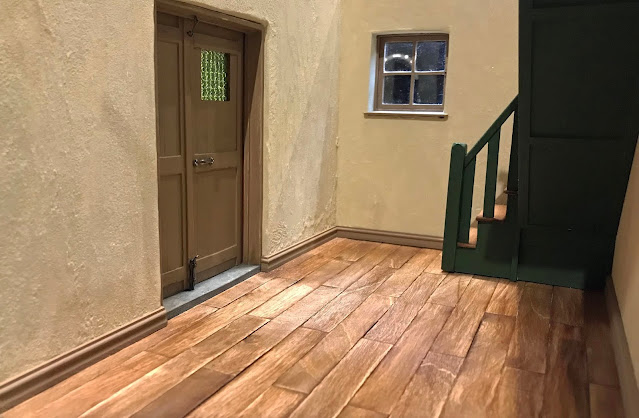
So this is where it is at. Other than a bit of trimming (beams?) along the top of the walls and getting the ceiling ready, there is not much left for me to do on this box. I cannot wait to fill jam packed with Furniture & Curiosities.
I had build the stairs before I even built the room box, so it was a great relief when they actually fit. These are the first stairs I have ever built, so I have to confess to feeling rather pleased with the result.
Next up will be the box for the flower shop next door.
Thank you everyone for stopping by. I cannot tell you how much your support, comments and suggestions means to me.
Have a great week(end)
Anna X
It looks great! You have to go on further with this!
ReplyDeleteThank you. Oh I will - this is only the beginning of a much bigger project :)
DeleteLooks beautiful, the walls, door and stairs and of course the floor very nicely done.
ReplyDeleteLove it.
Thank you so much - I look forward to getting the next floor done so I can fill this room with 'treasures'.
DeleteIt's stunning!
ReplyDeleteThank you for sharing your inspiring work.
Hugs, Drora
Thank you so much Drora, I am having too much fun, I think :)
DeleteAmazing space, Anna! You're going to be able to pack the charm in there to the rafters! And the stairs are fantastic! Once again you have proven to yourself that there is nothing you can't do well! I love it when a project is full of pleasant surprises and exceeds our fun expectations!
ReplyDeleteWell about those rafters... I still need to add those LOL - but then....
DeleteGreat work on the stairs. I also admit I am terrible with a ruler. This little room is simple but your attention to detail has given it so much character. Well done!
ReplyDeleteWell, I don't know what it is about rulers - but in my books they are never quite straight enough and in increments never the same LOL
DeleteHi Anna,
ReplyDeleteThe shoproom has turned out great. I love the final look of the floor. The stairs are good too. I wonder how the room will look when filled wit all the merchandise. :-)
Huibrecht
Thank you for stopping by Huibrecht
DeleteI am looking forward to filling the room, but I might build the next floor first, so I don't have to empty it again.
Good thinking!
DeleteHi Anna! I am late to comment, but visited this post a while ago...! The Stairs are Fantastic! Your technique turned out to be just right! I really appreciate the reminder that we can "make" our own handrails from regular stock! I tend to get stuck in the "gotta buy it" mind set! I agree that making the walls thick was important... If you need that window sill to be realistic it is worth losing the millimeters of interior space! The trim detail you added looks perfect... I understand wanting those corners to look right! Well Done! The whole room has really come together! I look forward to seeing more! :)
ReplyDeleteHi Betsy, thanks for stopping by!!
DeleteIsn't it just so easy to jump to the buy button...?? For this simple rail, I am glad that I decided to make the rail because it ended up looking a lot more simple than what I have seen online and I think it suits the simple stairs.
Anna X
I am happy about sacrificing a bit of floor space to get a decent window sill and am looking forward to filling it with knick-knack :)
I am wowed by this lovely space and can just imagine it filled with 'stuff' I sort of know a place just like this and this is where the old books and box games and boxed toys and quite a bit of other small junk is stacked for sale - It is one of my favourite bits of the shop.
ReplyDeleteAww thanks Marilyn! Trust me, I can hardly wait to pile it full...!!!
DeleteAs I said to Huibrecht, the sensible thing to do will be to wait until the next floor box is on so I won't have to take it all out again, but we'll see - I don't think I am going to be that patient LOL
X
I absolutely love this, stairs are impressive. I can understand why you agonised over putting the thick wall in at the end given that it's already a tight space but it does give an extra element of realism and as you say that window sill is going to be the perfect place to display some interesting tiny things.
ReplyDelete